Web Design
Templates
The three ways you can build a web page:
- Use a pre-made template: WHAT IS A WEB DESIGN TEMPLATE? A web site design template is a pre-made website design template which can be customized to reflect your company's branding. Website design templates can be found in various formats like Photoshop and HTML. Many times, these templates are compatible with HTML editors like GoLive, FrontPage, and Dreamweaver. Web site templates can be very useful; they can be used by experienced web designers to 'jump-start' the creation of a website. They are also a way for people to put out great-looking web sites quickly with little or no knowledge of HTML and web design.
- Use an HTML editor like FrontPage or Dreamweaver: HTML editors make building web pages feel like (to a certain extent) creating a document in Microsoft Word ... it's made pretty easy. But the downside is that you lose a certain amount of control of what you're doing and in some cases become dependent on the program.
- Hand-code your HTML in a text editor like Notepad: That means you type in the HTML code yourself. This is the approach we are going to use here, because it's the quickest way to learn how to build web pages, and it is arguably the best way because you have the most control over what you're doing.
Ok, now that we know the advantages of hand-coding web pages, let's jump into just the bare minimum of theory, then we will build our first web page!
What are HTML tags?
HTML tags are specifically formatted text that creates 'markers' for web browser to read and interpret. These 'markers' tell the web browser what and how to display things on the web page. Tags are placed in and around text and images (text and images are some of the 'things') that your want to have appear in your web pages.
HTML has a whole bunch of tags (just like the alphabet has a whole bunch of letters) that the web designer can use to build web pages. As mentioned above, tags have a specific structure so that when the browser is reading an HTML page, it knows the tags from the normal text.
Tags are typically words or abbreviations of words placed between angled brackets. So for example: to make text bold, HTML has the 'bold' tag that looks like this: <b>This text is bold</b>
Another commonly used tag is the paragraph tag:
<p>
This is a paragraph
</p>
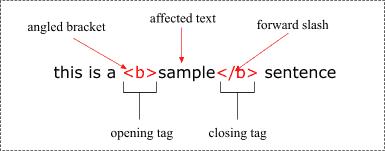
Tag Diagram
You may have noticed that HTML tags come in pairs; HTML has both an opening tag (<tag name>) and a closing tag (</tag name>). The only difference between the opening and closing tags is that the closing tag contains an extra forward slash.
Some EXAMPLE HTML tags that might make things clearer:
- <b>Makes text bold</b>
- <i>Makes text italic</i>
<h1>Tells the browser that this text is very important -the browser usually makes this text really big</h1>
<table>Creates an HTML table Think of a spreadsheet</table>
I hope you can see the pattern in the list above. HTML tags are not just for placing and formatting text, HTML tags can be used to include other things like: animation, video, Flash, audio, and even multimedia programs.
Comparing HTML code and the web page it creates
Let's start with a very simple web page to make it as easy for you to understand. First lets look at the final page: sample web page Now that we've seen what the page looks like, let's look at the HTML code used to create the page. What you should do now is take a little time and compare the HTML page and the page with the code that is used to create the page. Notice where the tags are and what they are doing.
The structure of an HTML page
An HTML page is divided into two major sections:
- The head: The head (<head>) section contains underlying information about the page which does not get displayed in the web page (except for the title of the page). It does, however, have an affect on how the web page is displayed.
- The body: The body (<body>) section: this section contains all the stuff that appears on the actual web page when someone happens to come along with their web browser. We are talking about the actual text, images, flash movies, and so on that people will see. That, of course, means the tags used to format all this stuff are there too...
You will notice that both the head and the body sections of a web site are marked in the HTML page with their respective tags: (<head> </head>) and (<body> </body>). If the body tag creates the body of an HTML page, and the head tag creates the head of an HTML page, how do you create an HTML page itself? You guessed it, use the HTML tags: <html> </html>
The 'mother of all tags' is the HTML tag, and like all tags it must have a start tag (<html>) and an end tag (</html>). The difference between the start and end tags is the forward slash (/), but you already knew that.
Every web page MUST begin and end with the HTML tag, otherwise the web browser (programs like Internet Explorer) will not be able to display the page. You also have to have the head tags and the body tags. All the other tags are optional.
So the bare-bones HTML page must have these tags and in this order:
<html>
<head>
<title>Title of your page</title>
</head>
<body>
</body>
</html>
BUILDING A WEBSITE
Introduction: What is a website?
A website is just a bunch of web pages connected together through something called links. In HTML there is a special tag called (you guessed it!) the 'link' tag, and it looks like this in its most basic form:
<a href = "..."> </a>
It's safe to say that we have all used links when surfing the web. Whenever you click on a link that takes you to another page, you are using a link tag. The link tag is the most important tag in HTML; it makes the Internet interconnected!
Like all other tags, link tags have an opening tag (<a href = "...">) and a closing tag (</a>). Links tags are a little more complex than the other tags we have seen so far, but I think that you can handle it!
Some of you may have noticed that there is some text in the link tag that comes before the web site address; the text I am talking about is this:
http://.
This text tells the browser that the link is pointing to a web page. Sometimes links can point to other things besides web pages; things like movies, PDF files, and so on.
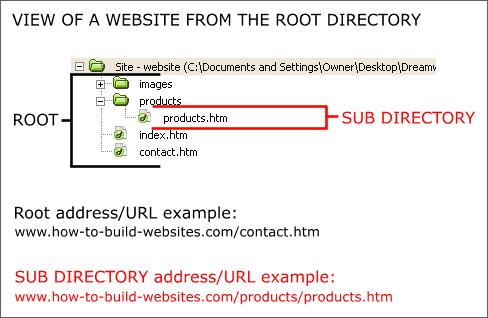
Absolute vs. Relative URL
To link pages in your web site from one page to the next you have a choice of using one of two types of addresses: absolute addresses (complete) and relative addresses (partial). Before I go on, URL is a nerd's way of saying 'address'. An absolute URL is the complete address of a page that can be found from any other location on the Internet. So let's say you have a page called contact.html on the root of your web site who's domain name is www.myStore.com . In this case, the absolute URL of the contact.html page would be: 'http://www.myStore.com/contact.html' Ok, now I know I lost a few people because I used a word that I did not explain: 'root'. When geeks talk about the root of a web site, they are taking about the base of the web site, the starting level. The files (pages, images, etc.) that make up your web site are organized in folders just like any other files that you store on your home computer. Your host will give you a space/directory on their server for you to place all your website's files. This space/folder assigned to you will be the 'root' of your web site. This means that as far as the Internet is concerned, anything (html files, images, other folders, etc.) in this folder is directly accessible by your domain name plus the name of the item. Huh! Even I'm a little confused! Perhaps a little example will explain this better: Let's say that on the root level of your website, you had these HTML files: index.html and contact.html And in a folder called 'products', you placed whole bunch of other pages with one called 'bookcases.html'. You decided to put all your 'product' HTML pages into a 'products' folder to keep the web site more organized - a smart thing to do!
Can you guess what the absolute URL would be for the web page 'bookcases.html'? For the domain name: 'www.myStore.com' it would be: http://www.myStore.com/products/bookcases.html. Just think about it a little and hopefully it will sink in! If it doesn't right away, don't worry, it will come.
Relative URL
A relative URL is a partial address that is relative to the page where you placed your link. So if you were linking from the index.html page of this web site to the bookcases.html page your relative URL (address) would be:
/products/bookcases.html.
And the actual link tag would look like this:
<a href = "/products/bookcases.html">Check out our bookcases!</a>
You are basically telling the browser that the HTML page we want to load is in the products folder. Play around with links and folders on your own web site and things will become very clear. This is important because if you get the address wrong, it won't load!
Ok, one more example to help you guys and gals out there: lets say you wanted to link to the page 'contact.html' from the 'index.html' page:
<a href = "contact.html">Contact us</a>
Since the page 'contact.html' is on the same level as the page 'index.html', we need only include the name of the html file in the link address.
CSS
What is CSS?
CSS is the acronym for: �Cascading Style Sheets�. CSS is an extension to basic HTML that allows you to style your web pages. An example of a style change would be to make words bold. In standard HTML you would use the <b> tag like so:
<b>make me bold</b>.
This works fine and there is nothing wrong with it per se, except that now if you wanted to, say, change all your text that you initially made bold to underlined, you would have to go to every spot in every page and change the tag.
Another disadvantage can be found in this example: say you wanted to make the above text bold, make the font style Verdana and change its color to red you would need a lot of code wrapped around the text:
<font color="#FF0000" face="Verdana, Arial, Helvetica, sans-serif"><strong>This is text</strong></font>
This is verbose (wordy) and contributes to making your HTML messy. With CSS you can create a custom style elsewhere and set all its properties, give it a unique name and then �tag� your HTML to apply these stylistic properties:
<p class = "myNewStyle">My CSS styled text</p>
And in between the <head></head> tags at the top of your web page you would insert this CSS code that defines the style we just applied:
<style type = "text/css">
<!--
.myNewStyle {
font-family: Verdana, Arial, Helvetica, sans-serif;
font-weight: bold;
color: #FF0000;
}
-->
</style>
In the above example we include the style sheet code inline, or in other words, in the page. This is fine for smaller projects or in situations where the styles you're defining will only be used in a single page. There are many times when you will be applying your styles to many pages and it would be a hassle to have to copy and paste you CSS code into each page. Besides, the fact that you will be cluttering up each page with the same CSS code, you also find yourself having to edit each of these pages if you want to make a style change. Like with JavaScript, you can define/create your CSS style in a separate file and then link it to the page you want to apply the code to:
<link href="myFirstStyleSheet.css" rel="stylesheet" type="text/css">
The above line of code links your external style sheet called �myFirstStyleSheet.css� to the HTML document. You place this code in between the <head> </head> tags in your web page.
To create an external style sheet all you need to do is create a simple text document (on Windows you simply right-click and select new -> text document) and then change it from a file type .txt to .css. You can change the file type by just changing the file names extension. The file name�s extension on Windows tells the computer what kind of file it is and allows the computer to determine how to handle the file when, for example, you try to open it.
You probably guessed it; CSS files are just specially (specifically) formatted text files much in the same way that HTML pages are. There is nothing special or different about the file itself, rather it is the contents of the file that makes a CSS document a CSS document.
When working with an external CSS document there are a couple of points to remember:
You DON'T add these tags in the CSS document/page itself as you would if you embedded the CSS code in your HTML:
<style type = "text/css"></style>
Since the link in your web page connecting the CSS page to your HTML page says that you are linking to a CSS page, you don�t need to declare that the code in the page is CSS. That is what the above tags do. Instead you would just add your CSS code directly to the page:
.myNewStyle {
font-family: Verdana, Arial, Helvetica, sans-serif;
font-weight: bold;
color: #FF0000;
}
.my2ndNewStyle {
font-family: Verdana, Arial, Helvetica, sans-serif;
font-weight: bold;
color: #FF0000;
}
.my3rdNewStyle {
font-family: Verdana, Arial, Helvetica, sans-serif;
font-weight: bold;
font-size: 12pt;
color: #FF0000;
}
In the above example I have created a series of CSS classes that can be applied to any HTML tag like so:
<p class = "myNewStyle">My CSS styled text</p>
or
<h2 class = �my3rdNewStyle�>My CSS styled text</h2>
You will notice that in the above example I applied a CSS style to an <h2> tag. This tag sets the size of the text that it wraps to a size that is preset in the browser (ex: 10 pixels). When you apply a CSS class to it, the CSS code overrides the default size that you would normally get with an <h2> tag in favor of the size specified in the CSS class. So now you can see that CSS can override default HTML tag behavior!
In the above examples, I have CSS code where I define my CSS classes and then �apply� them to various elements in the page. Another way to apply CSS is to globally redefine an HTML tag to look a certain way:
h1 { font-family: Garamond, "Times New Roman", serif; font-size: 200%; }
What this CSS code does is set the font style and size of all <h1> tags in one shot. Now you don't have to apply a CSS class as we did before to any <h1> tag since they are automatically all affected by the CSS style rules.
Here is another example of where I give the whole page bigger margins:
body { margin-left: 15%; margin-right: 15%; }
As you can see, you can redefine any tag and change the way it looks! This can be very powerful:
div {
background: rgb(204,204,255);
padding: 0.5em;
border: 1px solid #000000;
}
Set in the above code, any <div></div> tag will now have a background color of �rgb(204,204,255)� and have a padding of 0.5em and a thin 1 pixel border that is solid black.
A few things to explain about the above:
Color in CSS can be expressed in a few ways:
- In Hex -> for example: #000000 � this is black and this: #FF0000 is red.
- In rgb -> rgb(204,204,255) is a light purple-blue color.
- With named colors like: �red� or �blue�
I typically use hex color since I am familiar with them or I just use named colors. So the last example can be rewritten like so:
div {
background: green;
padding: 0.5em;
border: 1px solid #FF0000;
}
So instead of �rgb(204,204,255)� , I just specified �green�.
By using RGB (RGB is the acronym for: �Red Green Blue�) and Hex color, you can really get the exact color you want easily when you know your codes. Luckily many programs (like Dreamweaver) provide easy to use color pickers for you so you don�t need to know the values for the code.
In this last example I will show you the �super cool� CSS code that allows you to create link roll-over effects without images:
:link { color: rgb(0, 0, 153) } /* for unvisited links */
:visited { color: rgb(153, 0, 153) } /* for visited links */
:hover { color: rgb(0, 96, 255) } /* when mouse is over link */
:active { color: rgb(255, 0, 102) } /* when link is clicked */
The above CSS will cause your link to change color when someone hovers their mouse pointer over it, instant rollovers with no images! One important note with the above code is that it is important that the style declarations be in the right order: "link-visited-hover-active", otherwise it may break it in some browsers. CSS is very powerful and allows you to do things that you can�t do with standard HTML. It is supported nicely now in all the modern browsers and is a must learn tool for web designers. The above examples are just a small sample of what you can do with CSS, but it should be more than enough for you to start styling your pages nicely. Like with many technologies, CSS has a lot of capability that most people will not need to use often if at all. Don�t get caught in the trap of thinking that if there is some functionality/feature available, that you have to use it.
Advanced HTML
Maybe this lesson should have been called: 'Developing an advanced understanding of HTML fundamentals'. We are not trying to learn advanced tricks or new tags, we are doing something far more useful: Understanding the basics is what separates the pros from the amateurs.
Introduction
HTML is a relatively simple technology to learn, so easy in fact that once people get just a very basic understanding, they jump into building web pages without much thought about learning anything more about the fundamentals of HTML. As such, most web designers are not taking full advantage of HTML and CSS; they are wasting their time and money, generally making their lives more difficult. The differences between logical and physical tags is one of the key fundamental concepts in HTML that, when understood, can have a huge impact on a web designer's way of doing things.
Logical inline tags vs. Physical inline tags
Logical Tags
In HTML there are both logical tags and physical tags. Logical tags are designed to describe (to the browser) the enclosed text's meaning. An example of a logical tag is the <strong></strong> tag. By placing text in between these tags you are telling the browser that the text has some greater importance. By default all browsers make the text appear bold when in between the <strong>and</strong> tags, but the point to take away from this is that the strong tag implies the importance of that text. This has impact with search engines like Google who look for such tags to help figure out what the page is about. There are many logical tags and they include:
- <strong>: Strong - as above.
- <em>: emphasize - usually renders (made to look like by the browsers) as italic.
- <span>: a neutral inline container. - Read about this distinction below.
- <div>: a neutral block element. - Read about this distinction below.
Logical tags, as mentioned above, have default ways in which browsers (like IE or Opera) render them. But it is understood that CSS should be used to give them their style, or in other words their 'look'.
Physical Tags
Physical tags on the other hand provide specific instructions on how to display the text they enclose. Examples of physical tags include:
- <b>: Makes the text bold.
- <big>: Makes the text usually one size bigger than what's around it.
- <font>: Used to apply a font-face (like Arial or Helvetica) and font-color.
- <i>: Makes text italic.
Physical tags are more straightforward; <i> makes the text italic, <b> makes text bold and <font> is used to set the font face and color for the text. So why use one or the other? In a nutshell, physical tags were invented to add style to HTML pages because style sheets were not around, though the original intention of HTML was to not have physical tags. Why? Well physical tags are just messy, tedious, and are more trouble than they're worth (for the most part). Rather than use physical tags to style your HTML pages, you should be using style sheets (also called Cascading Style Sheets or CSS).
Block level vs. Inline tags
What is the point of 'inline' in the description of the tag categories? In HTML, tags are either 'inline' or 'block-level' elements.
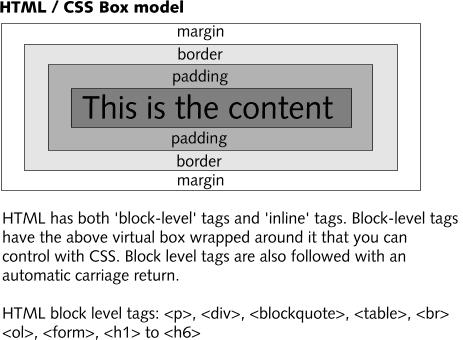
Block level HTML elements
Block-level elements exist in their own virtual 'box' and are always followed by a line break (like hitting the 'enter' key after typing in some text). In other words, a block-level element breaks the flow of text and other elements to create a virtual box around itself.
Inline HTML elements
Inline tags (elements) become a part of the 'flow' of text in which they are inserted and have no 'box' around them and don't have the line break, either. An example of a block tag is a <p> tag (paragraph) and an example of an inline tag is the <b> (bold) tag. Try the tags out and you'll see what happens to your page when you use <p> tags and <b> tags; all will be made clear once you see it for yourself.
So who cares? You should care! Once you understand the differences (it's really not that hard if you just give yourself a chance) and once you understand that you can use CSS to change elements from being block tags to inline tags and vice versa, you will discover tremendous power in your ability to layout your pages.
Source: LearnTheNet.com