Microsoft Office Power Point
PowerPoint is a versatile presentation tool. This software has an outliner to help organize your presentation to an on-screen slide show complete with special effects. You should find this tool useful for both your presentation and your students' presentations. Let's take a look at the PowerPoint screen:

When you start PowerPoint, you will be presented with some options. These include: The "Create a New Presentation Using" window.

You may select the appropriate option.
After clicking [OK], you will be presented with the "Choose an AutoLayout"
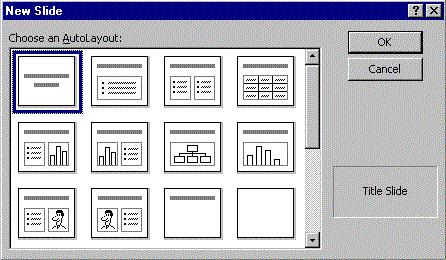
Click on the AutoLayout of your choice. The default first slide is the Title. Notice that the default is highlighted with a dark border (in this example it is the Title slide). You may select any of the nine AutoLayouts by simply double clicking on the layout of your choice, or click once to select and then click on the [OK] button. After you have gone through these introductory steps, you will be presented with the PowerPoint editor page shown at the top. You will now be ready to create your presentation.
Using the Common Tasks Menu
When you enter PowerPoint you are also presented with a "floating" Common Tasks menu palette. This palette contains three commonly used functions: "New Slide", "Slide Layout", and "Layout Design". You can position this "floating" menu to a location of your choice. Simply click on one of the choices with your mouse and PowerPoint will begin the operation.
Toolbar

Most PowerPoint options can be found in the Pull-Down Menus. But for this tutorial we will concentrate mostly on the button controls. Let's examine just a few of the basic buttons and their functions.
Templates
PowerPoint comes equipped with a number of designs or background "templates." Designs assist you with creating your presentations. When you select the design you will find that this presents the user with more than just a background. In fact, the design will control many different features of the slides. This includes the background image, text size, text location, text color, and more.
Apply Design
When you pick Apply Design, you will be presented with a window of design options:
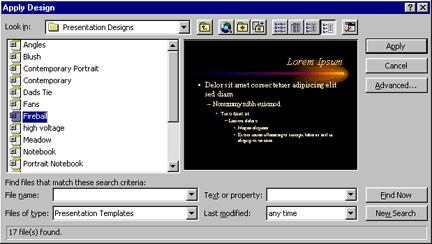
You can preview the "template" of choice by clicking ONCE on the name of the design. For example, the design shown above is "fireball". When you click on the name of the design, an example of the template/design will be displayed in the right-hand window. If you would like to apply the design to ALL slides, then click [Apply]. SPECIAL NOTE: once you apply a design, you will always have a design on your slides. You can change the design (template), but you will always have a template.
Some presentation designers like to select a design/template when they begin a series of presentation slides. Others like to add their design after building the initial slides. But it is important to note that when you add a design/template after you have built the slides, the text, location of text, and color of text will probably change.
Transitions and Animations
Transitions
You can create special effects on PowerPoint On-Screen Presentations. You do this by selecting [Slide Show] and [Slide Transition...]
- You can set the transition effect by clicking on the Effect Pull-Down and select any of the available effects.
- Set the Speed of the transition (Slow, Medium, or Fast).
- Set whether the transition is Manual (Mouse Click) or Automatic after a specified number of seconds.
Tips
- You can also view the transition you selected. The picture in the lower-right will go through the transition you selected. If you want to see it again, click on the picture.
- You can add a transition sound by clicking on the Sound pulldown menu and selecting one of the options.
- You can apply the transition to all slides [Apply to All] or you can [Apply] the transition to just the current slide.
Preset Animation
Preset animation provides a number of "quick pick" animation effects. You will need to first select the image or entity that you wish to animate. Then just pick the Preset Animation effect you wish to use.
Custom Animation
Custom animation provides an extensive number of animation variations.
- When Timings is selected, you will see the various slide elements labeled in the lower-left frame.
- To animate the element (text, image, etc.) click ONCE on the element name. When it is highlighted, click on the [Effects] tab.
- The following Effects window will now be displayed:
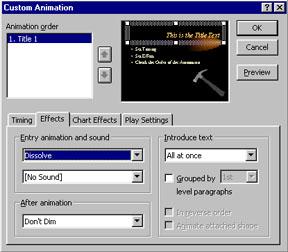
- After selecting an Effect from the pulldown menu...
- You can select sounds, control the text color intensity and other effects after the animation process takes place. This is useful for creating the effect commonly called "progressive disclosure" (previous line of text is dimmed when next line of text is the focus point.
- You can also introduce text in various ways. For example using the "Introduce Text" settings you can animate text so that it appears all at once, by word, or by letter.
Tips
- Do not let animations dominate the content/information.
- Some animations are difficult to track with the eye when viewing a presentation. Always test your animations before your final presentation.
- The speed of the machine you are working on will dictate the speed of the animation. If you are using a "fast" machine to create the slides and setting the animations, and then use a slower machine for presentation...the animation effects may not be what you had expected.
Printing
When you are ready to make hardcopies of your presentation, you will need to select [File] ... [Print].
Tips
- Unless you are using a color printer, select Black and White to save on toner.
- To print certain pages, select Slides and enter the beginning and ending page numbers.
- If you want to print handouts of your slides (with multiple slides per printed page), select your options from the pulldown.
Source: Oregon State University